SOFTWARE
하우컴퓨터 Remote Support
 1 1
|
| 567581 | 2006-04-15 |
SOFTWARE
How to turn off notifications in Windows 10
 |
| 174867 | 2020-06-16 |
SOFTWARE
불법소프트웨어 뒤에 숨은 보안위협
 |
| 568201 | 2008-10-12 |
SOFTWARE
Enabling Korean Read & Writing
 |
| 565630 | 2009-01-16 |
SOFTWARE
CD-ROM 드라이브 아이콘이 없어지거나 ...
 |
| | 2011-10-13 |
SOFTWARE
Reporting Piracy Inside the United States
  |
| 667692 | 2011-02-24 |
SOFTWARE
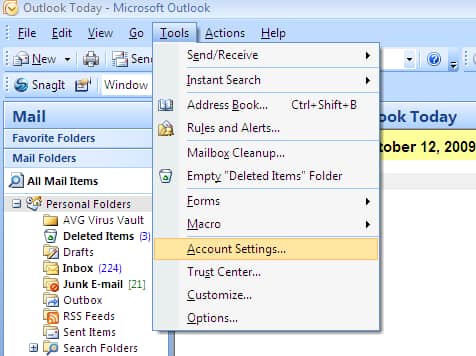
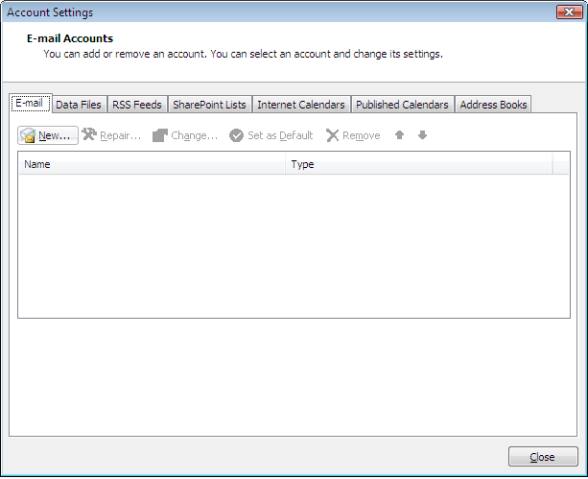
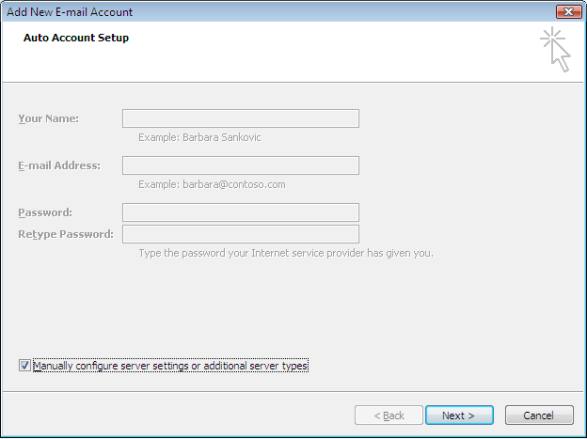
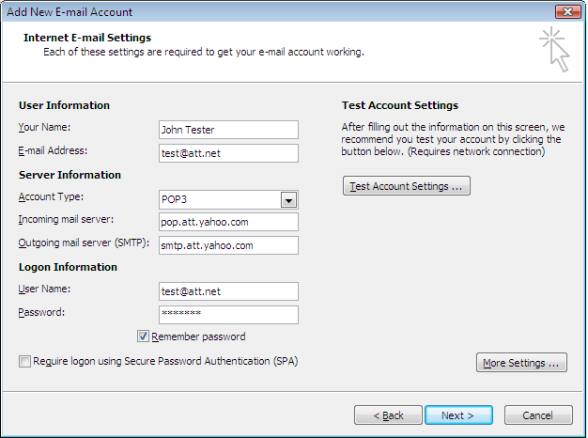
Setting up a new AT&T/SBC DSL account
 |
| 14506 | 2009-02-20 |
SUPPORT
Click the following link to download Remote Help Access Program.
 |
| | 2009-04-04 |
|
SOFTWARE
TWITTER-HOWCOMPUTER JOIN PAGE
|
| 571245 | 2010-05-31 |
HARDWARE
Notebook Computer Upgrades & Repair
  |
| 556931 | 2010-06-02 |
|
Installing the Korean IME in Windows Vista NEW
|
| 623543 | 2009-03-25 |
HANGUL SUPPORT
Howcomputer is Haansoft authorized distributor for West Coast America
  |
| 617968 | 2009-06-26 |
SOFTWARE
Understanding Downgrade Rights
  |
| 668561 | 2009-03-31 |
|
SOFTWARE
착한 가격, 벗은 가격 - 원하시는 물건 - 이곳에서
|
| 628099 | 2009-04-02 |
|
SOFTWARE
Validation Advisor
|
| 698422 | 2009-06-04 |
SOFTWARE
Windows Vista Service Pack 1 All Language Standalone (KB936330)
 |
| 4997 | 2009-12-31 |
SOFTWARE
윈도 메신저를 이용한 원격지원(원격제어) 방법
  |
| 5558 | 2009-09-09 |
SOFTWARE
불법소프트웨어 단속 안내
  |
| 673179 | 2009-10-02 |
|
HowComputer's Reseller Application
|
| 643185 | 2009-10-19 |
SOFTWARE
Windows 7이란?
  |
| 636539 | 2009-10-22 |
SOFTWARE
불법 복제 제보
  |
| 621075 | 2009-11-02 |
HARDWARE
노트북 LCD 고장증상
 |
| 561390 | 2009-12-04 |
SOFTWARE
- 고객을 우선하는 365일 연중무휴 서비스 !!!
 |
| | 2010-02-20 |
|
SOFTWARE
인터넷 사용 불가능 유도 악성코드 주의 안내 (Bredolab 악성코드)
|
| 635301 | 2010-02-28 |
Computer & Network Services - In Store Service $30.00 ~
  |
| 552565 | 2010-05-06 |
DELL SYSTEM RESTORE
 |
| | 2011-11-11 |
HARDWARE
How to replace your damaged notebook or laptop lcd screen
 |
| | 2011-11-21 |
|
QuickBooks Support - Download QuickBooks products
|
| 688825 | 2011-11-29 |
SOFTWARE
FindIP.kr IP 주소를 확인하는 가장 쉬운 방법!
 |
| 721749 | 2012-02-28 |
|
SOFTWARE
도스 윈도 네트워크 명령어
|
| 680744 | 2012-02-28 |
SOFTWARE
무료 바이러스 백신
 |
| 749984 | 2011-03-13 |
|
SOFTWARE
윈도우 7 단축키 유용하게 사용해봅시다!
|
| 603173 | 2011-04-08 |
Windows Virtual PC
 |
| | 2010-07-13 |
|
SUPPORT
PC TUNE-UP - Lowest Price
|
| 568476 | 2010-09-04 |
SOFTWARE
무료 백업 프로그램 Cobian Backup 9
  |
| | 2010-09-16 |
|
SOFTWARE
안철수연구소, 페이스북으로 유포되는 악성코드 경고
|
| 627371 | 2010-10-05 |
HowComputer 동영상
 |
| 552044 | 2011-01-04 |
SOFTWARE
Internet Explorer
 |
| | 2016-11-09 |
SOFTWARE
Fix it 솔루션 센터 시작 / 문제에 대한 자동 솔루션 찾기.
 |
| | 2011-08-22 |
SOFTWARE
CA Internet Security Suite
 |
| | 2011-08-29 |
HARDWARE
iPad 2 screen replacement, iPad 2 digitizer replacement / repair / guide
 |
| | 2012-02-15 |
SOFTWARE
Install Flash Player in five easy steps
 |
| 258254 | 2020-01-13 |
|
SOFTWARE
Hot Mail Account Closed
|
| 658025 | 2012-03-01 |
|
HARDWARE
노트북이 꺼질때 의심해 봐야 하는것 - 쿨러 접촉 불량
|
| 647750 | 2012-03-23 |
SOFTWARE
How to Manage AutoArchive in Outlook 2010
 |
| 604889 | 2012-04-20 |
howcomputer QR CODE
 |
| 575573 | 2012-06-18 |
Local disk resources not working when connecting with remote desktop
 |
| | 2012-06-29 |
|
SUPPORT
IN-STORE REPAIR CENTERS
|
| 640439 | 2012-09-01 |
SOFTWARE
맥(Mac) 방식으로 포맷한 하드디스크, usb 윈도우7(windows7)에서 인식시키기
 |
| | 2012-09-24 |
HARDWARE
모니터 고장증상과 수리비용 그리고 분해방법
  |
| | 2012-09-27 |
SOFTWARE
How to remove System Progressive Protection virus !!!
  |
| | 2012-10-06 |
|
SOFTWARE
http://www.abingdonpress.com/
|
| 712178 | 2012-10-24 |
SOFTWARE
Advanced SystemCare 5 - now smarter, faster and even more powerful
 |
| | 2012-11-17 |
HARDWARE
How to repair a volume on DiskStation
  |
| | 2012-12-08 |
SOFTWARE
Do I need Windows XP Mode?
 |
| | 2012-12-16 |
SOFTWARE
UltraTax CS: CreateProcess (X:\WinCSI\UT11\UTWPP.EXE) Failed To Start
 |
| | 2013-01-16 |
[투도우, 유쿠, 소후] 중국 지역에서만 볼 수 있다는 안내문이 나올경우 해제방법
  |
| | 2013-01-21 |
SOFTWARE
Download QuickBooks products
 |
| | 2013-01-22 |
SOFTWARE
토도우, 유쿠 버전 동영상을 중국지역에서만 볼수 있다는 오류 메시지가 나올때의 해결방법입니다
 |
| | 2013-01-25 |
SOFTWARE
MAGENTO HOSTING
  |
| | 2013-02-05 |
|
SOFTWARE
GoDaddy Email Setup 2010
|
| 442764 | 2015-03-27 |
HARDWARE
How to Samsung Recovery
 |
| 394747 | 2015-03-19 |
SOFTWARE
GT-N8013 How To Perform A Factory Data Reset
 |
| | 2013-02-09 |
SOFTWARE
How do I back up, restore, or create a new UPS WorldShip database?
  |
| | 2013-02-09 |
SOFTWARE
해외차단 사이트,스포츠 생방송보기,PC와 스마트폰도 가능
  |
| | 2013-03-14 |
|
HowComputer Business Hour
|
| 1005313 | 2013-08-28 |
|
SOFTWARE
알아두면 유용한 윈도우8 단축키 윈도우키 조합 리스트
|
| 926327 | 2013-04-23 |
|
SOFTWARE
Inventory Control Software Trial
|
| 1104339 | 2013-04-25 |
|
SOFTWARE
http://speller.cs.pusan.ac.kr/
|
| 976531 | 2013-05-13 |
윈도우8 안전모드 부팅방법
 |
| 1255186 | 2013-06-28 |
SOFTWARE
윈도우7에서 한글 입력(한글 입력기)가 안될때 해결방법
  |
| | 2014-01-28 |
SOFTWARE
아이폰과 아이패드 종류의 공장초기화 방법
 |
| 462507 | 2014-02-14 |
SOFTWARE
NTLDR IS Missing Press CTRL + ALT + DEL Restart 메시지가 나오고 아무런 동작을 하지 않았습니다.
  |
| | 2014-02-26 |
SOFTWARE
Outlook에서 찾기 기능을 사용 하면 "검색을 수행할 수 없습니다" 오류 메시지가 나타난다
  |
| | 2014-03-06 |
SOFTWARE
윈도우 XP 서비스 지원 종료
 |
| 461599 | 2014-03-18 |
SOFTWARE
GATEWAY FACTORY RECOVERY
 |
| | 2014-04-04 |
|
Windows XP(윈도우 XP)에 대한 지원이 2014년 4월 8일에 종료됩니다. 지원 종료 이후에는 XP PC를 보호할 수 없습니다.
|
| 456778 | 2014-04-04 |
|
SOFTWARE
GAME Sites
|
| 455082 | 2014-05-23 |
맥 에서 한영키 전환 방법
 |
| 415481 | 2014-06-26 |
SOFTWARE
MAC OX Lion 10.7
 1 1
 |
| 404737 | 2014-06-29 |
SOFTWARE
BOOTMGR is missing press Ctrl+Alt+Del to restart
 1 1
  |
| | 2014-10-24 |
|
SOFTWARE
Internet Explorer download
|
| 430831 | 2014-12-31 |
SOFTWARE
Increase maximum size pst-files
 |
| 504964 | 2015-01-16 |
포토샵 jpg 저장이 안돼요. jpg저장하는 방법
 |
| 400996 | 2015-01-16 |
SOFTWARE
Email sent using Outlook are not saved to the Sent Items folder
 |
| 466239 | 2015-01-16 |
HARDWARE
How do I log into the modem’s Web User Interface?
 |
| 487468 | 2015-02-24 |
SOFTWARE
Can't create file : Document.pdf. Right-click the folder you want to create the file in, and then click properties on the shortc
 |
| 469407 | 2015-04-15 |
SOFTWARE
https://helpx.adobe.com/kr/x-productkb/policy-pricing/cs6-product-downloads.html
 |
| | 2015-04-22 |
|
Open the Local Group Policy Editor
|
| 466271 | 2015-04-30 |
SOFTWARE
PC AMERICA Backing up your Database
 |
| | 2015-05-09 |
SOFTWARE
Changing the Administrator Password and Administrator Card Swipe
 |
| | 2015-05-09 |
|
SOFTWARE
Is your Windows genuine?
|
| 418333 | 2015-06-30 |
Hyperlinks are not working in Outlook
 |
| 876608 | 2015-08-06 |
Windows PC용 키보드 Mac에서 사용하기
 |
| 429138 | 2015-08-20 |
HARDWARE
How to figure out if you Panasonic Phone is compatible:
 |
| | 2015-10-13 |
|
SOFTWARE
http://coverage.sprint.com/IMPACT.jsp?ECID=vanity:coverage
|
| 421900 | 2015-10-15 |
SOFTWARE
Open the Local Group Policy Editor
 |
| | 2015-11-02 |
|
SOFTWARE
Allowing less secure apps to access your account
|
| 446481 | 2015-11-11 |
SOFTWARE
Open the Local Group Policy Editor
 |
| | 2015-11-30 |
SOFTWARE
Error H101, H202, H303, or H505: when opening your company file
 |
| 437520 | 2016-01-06 |
|
SOFTWARE
Windows 7 Not genuine 7601
|
| 366095 | 2016-01-07 |
|
HARDWARE
Startup key combinations for Mac
|
| 418130 | 2016-01-14 |
SOFTWARE
윤달
 |
| 2 | 2016-01-30 |
SOFTWARE
Remove CryptoLocker virus (Files Encrypted Ransomware)
 |
| | 2016-02-08 |
SOFTWARE
Boot Camp Download
 |
Redwine | | 2019-03-28 |
|
SOFTWARE
7 ZIP Utlity + Etc Download
|
| 217495 | 2019-04-05 |
|
SOFTWARE
Windows lifecycle fact sheet
|
| 258136 | 2019-04-05 |
SOFTWARE
Download QuickBooks Desktop
 |
| | 2019-05-14 |
SOFTWARE
iDive Reseller
 |
| 210654 | 2019-05-17 |
SOFTWARE
Use your Apple Keyboard in Windows with Boot Camp
 |
Redwine | 265077 | 2019-09-18 |
HARDWARE
"10.XXXX Supply Error
  |
| | 2016-03-24 |
HARDWARE
EX or HD-SDI Order
  |
| 323505 | 2016-03-31 |
NEWS
손가락 눌러 건강 지키기
 |
| 315884 | 2016-04-10 |
FUNZONE
캘리포니아 유명 캠핑장
  |
| | 2016-04-20 |
|
SOFTWARE
QuickTime download
|
| 356976 | 2016-05-03 |
SOFTWARE
Microsoft Support Lifecycle
 |
| 386761 | 2016-05-17 |
SOFTWARE
* RECOMMENDED * Intel C220 Series Platform Controller Hub NMI Fix for Windows Server 2008 R2
 |
| | 2016-05-20 |
SOFTWARE
0x0000007e error
  |
| | 2016-05-24 |
SOFTWARE
What Happens If MBR Is Damaged or Corrupted?
 |
| 248851 | 2019-10-16 |
SOFTWARE
How to stop automatic updates on Windows 10
 |
| 256765 | 2019-10-24 |
|
SOFTWARE
TimeWarnerCable Voice Manager
|
| 391889 | 2016-06-08 |
SOFTWARE
Gmail IMAP Setting
  |
| | 2016-06-09 |
SOFTWARE
Mac White Screen: How To Fix Your Mac That Won’t Turn On
  |
| | 2016-06-14 |
SOFTWARE
윈도우 업데이트 실패문제
 |
| 277716 | 2016-07-15 |
|
SOFTWARE
x64 기반 시스템용 Windows 7 시스템 업데이트 준비 도구(KB947821)[2014년 10월]
|
| 341450 | 2016-07-15 |
|
SOFTWARE
Windows Update Fail
|
| 347776 | 2016-07-15 |
|
SOFTWARE
QuickTime
|
| 334083 | 2016-08-09 |
|
SOFTWARE
When do you get this error in the Windows Update process? Try clearing this folder and trying Windows Update again: C:\Windows\SoftwareDistribution\Download
|
| 280155 | 2016-08-12 |
SOFTWARE
HowComputer Software Download
 |
| | 2016-09-18 |
SOFTWARE
Enable Remote Desktop
 |
| | 2016-09-20 |
|
SOFTWARE
여러분이 모르고 계셨던 불법 복제의 위험과 PC 보호 방법에 대해 알려드립니다.
|
| 310477 | 2016-10-11 |
SOFTWARE
Flash Player Issues | Windows 10 | Internet Explorer
 |
| 537869 | 2020-01-13 |
SOFTWARE
Windows 10 시스템에서 BIOS 셋업에 진입하는 방법 - Idea 노트북/데스크톱
 |
| 338235 | 2017-01-13 |
SOFTWARE
How to configure the size limit for both (.pst) and (.ost) files in Outlook
 |
| 337250 | 2017-01-26 |
|
SOFTWARE
google security
|
| 336209 | 2017-04-06 |
|
HARDWARE
https://support.microsoft.com/en-us/help/4012982/the-processor-is-not-supported-together-with-the-windows-version-that-
|
| 291900 | 2017-04-19 |
SOFTWARE
information on Panasonic voice processing systems
  |
| | 2017-05-03 |
|
SOFTWARE
https://support.microsoft.com/en-us/help/2769651/outlook-search-returns-no-matches-found
|
| 254458 | 2017-06-19 |
SOFTWARE
Microsoft Activation
 |
| | 2017-07-18 |
SOFTWARE
정식 지원이 중단될 윈도우 7을 안전하게 사용하는 9가지 방법
 |
| 191582 | 2020-01-16 |
|
SOFTWARE
VMWARE
|
| 278951 | 2017-07-20 |
Either there is no default mail client or the current mail client cannot fulfill the messaging request" error message when you send e-mail from third-party program in Outlook
 |
| | 2017-07-28 |
SOFTWARE
Windows Essentials
 |
| | 2017-08-11 |
SOFTWARE
Windows 에서 폴더 및 파일의 전체 경로 길이
 |
| 274944 | 2017-08-16 |
|
Description of the Windows Update Troubleshooter
|
| 246613 | 2017-11-20 |
|
SOFTWARE
lpksetup
|
| 257468 | 2017-12-13 |
|
SOFTWARE
하우컴 Review Badges Yelp
|
Redwine | 239412 | 2017-12-27 |
|
SOFTWARE
컴퓨터 비밀번호 분실 ~
|
| 218324 | 2017-12-28 |
HARDWARE
Advanced IPv4 Configuration
 |
| 245174 | 2018-01-15 |
|
SOFTWARE
Free & Public DNS Servers (Valid January 2018)
|
| 292797 | 2018-01-17 |
|
SOFTWARE
ACROBAT READER
|
| 310236 | 2020-07-16 |
SOFTWARE
Howcomputer Location-위치
  |
Redwine | 152078 | 2020-08-05 |
|
SOFTWARE
Switching out of S mode in Windows 10
|
| 128407 | 2020-11-10 |
수동으로 USB부팅 디스크 만들기..
 |
| 230214 | 2018-03-15 |
SOFTWARE
여러 컴퓨터에서 읽기 POP3 전자 메일 메시지
 |
| 222991 | 2018-05-01 |
SOFTWARE
Read POP3 email messages on multiple computers
 |
| 367199 | 2018-05-01 |
SOFTWARE
Windows(윈도우)에서 ROBOCOPY를 이용한 파일 백업
  |
| | 2020-03-04 |
|
SOFTWARE
QuickBooks Data Services: Standard Data Recovery Services (Price list)
|
| 360116 | 2018-05-18 |
|
SOFTWARE
Maximum number of list entries (list limits and custom fields) Quickbook
|
| 265626 | 2018-05-19 |
|
SOFTWARE
How to use Remote Desktop
|
| 214483 | 2020-06-23 |
SOFTWARE
HowComputer Teamviewer MAC USER Access
 |
| 203827 | 2018-12-19 |
|
SOFTWARE
Howcomputer Kakao ID 추가
|
| 231159 | 2018-12-31 |
SOFTWARE
Microsoft Updates KB4481480, KB4480970, KB890830, Issues with Remote Desktop and Remote Access
 |
| | 2019-01-10 |
SOFTWARE
Use your Apple Keyboard in Windows with Boot Camp
 |
Redwine | 203724 | 2019-03-28 |
|
SOFTWARE
AVG CONSOLE
|
| 108151 | 2020-12-17 |
|
SOFTWARE
CMS - DVR Remote Software
|
| 115936 | 2020-12-29 |
|
HARDWARE
Product Support Status
|
| 125649 | 2021-09-09 |
|
HARDWARE
Windows Processor Requirements
|
| 93173 | 2021-10-06 |
|
SOFTWARE
Install TeamViewer on Windows
|
| 54032 | 2022-04-22 |
|
Christmas offer: 68% off NordVPN + 3 months free
|
| 41331 | 2022-12-19 |
|
SOFTWARE
Install TeamViewer on Windows
|
| 54032 | 2022-04-22 |
|
HARDWARE
capi_worker module has encountered a problem and needs to close
|
| 49092 | 2011-06-30 |
SOFTWARE
Installing East Asian Language Support Under Windows XP
 |
| 48211 | 2012-04-16 |
|
SOFTWARE
맥은 바이오스나 씨모스 그런거 없나요?
|
| 46944 | 2009-10-11 |
|
SOFTWARE
How to Setup Exchange Active Sync for the iPhone
|
| 45263 | 2012-04-20 |
|
HARDWARE
데이타 복구 가능한 하드의 고장 증상
|
| 41630 | 2011-07-16 |
HARDWARE
RAID 구성 1
 |
| 41428 | 2010-09-01 |
HARDWARE
문의 하신 Jason 씨 - Lenovo G530 (444623U) 15.4 inch Pentium Dual-Core 2.16GHz/ 2GB/ 160GB/ DVDRW/ WVHB Notebook Computer
  |
| 41417 | 2009-06-01 |
|
Christmas offer: 68% off NordVPN + 3 months free
|
| 41331 | 2022-12-19 |
HARDWARE
Hot Buy Q9300 2.5Ghz, 500G HDD, 3G DDR2 - $550.00
  |
| 40674 | 2009-05-12 |
|
HARDWARE
프린터를 설치하지 못하거나 속성을 볼수 없을때
|
| 40436 | 2009-09-01 |
|
HARDWARE
Manufacturers Driver Download Links
|
| 39950 | 2009-02-03 |
SOFTWARE
INTUIT Point of Sale > Hardware and Supplies
 |
| 38063 | 2011-06-02 |
|
SOFTWARE
Computer IP 보기
|
| 37707 | 2010-01-12 |
HARDWARE
3GB가 넘는 RAM을 사용하는 컴퓨터에 Windows Vista를 설치하려고 하면 "STOP 0x0000000A" 오류 메시지가 나타난다
 |
| 37607 | 2009-02-03 |

